Table of Contents
- Summary / Features
- Operating Environment / Important Points
- Getting Started
- Screen Configuration
- Edit Board - Edit Sticky Item - Edit Photo Item - Handwriting Preview - Handwriting Input
- Edit Handwritten Item - Edit Board Frame - Widget Registration
- How to Use
- Register Sticky by Text Input - Register Sticky by Voice Input - Register Sticky by Handwriting - Register Photo
- Change Sticky and Photo Layout - Register Boardwidget - Change Board Frame
Summary / Features
Summary
"Boardwidget" is a Widget app in which you can freely arrange the layout of sticky and photos on your home screen. Location, angle, size, and design can be customized freely, allowing you to create a cute and stylish home screen.You can spread sticky with text and handwriting input all over the screen as TODO's, and create a stylish layout for your family photos.
Features
- A Widget to freely layout sticky and photos on your home screen
Layout sticky and photos freely on your screen.You can adjust the size and angle of sticky and photos. Instead of systematically lining up icons and Widgets, you can use design materials to create stylish layouts or cover the entire screen to arrange your home screen freely.
- -Voice- and handwriting input-capable sticky
Create sticky by inputting text, voice, and handwriting.You can set the size and color of characters for text sticky, as well as select sticky designs.You can also insert icons into handwritten sticky.
- Photos with selectable design frames
Photos shot by camera and loaded from the gallery can be pasted to the board.Designs for pins and frames are selectable.
- Multiple boards can be created
You can create multiple boards, and select different frames for each board.Boards you’ve created can be used as Widgets.
- Make it even more attractive with purchasable themes
An abundance of designs for sticky, pins, photo frames, and board frames are included as defaults.If you want to use more attractive designs, you can do so by purchasing additional themes.Four themes- "Gothic", "Handmade", "Pop", and "Stationary" - are available for use.
List of Addable Items
![]()
Operating Environment / Important Points
Android OS: 2.1/2.2/2.3/4.0
Recommended Resolution: 854x480, 800x480
This application connects to the Internet.Please beware that packet charges may be applicable depending on your configuration settings and/or contract details.
*When you create widget in "High Resolution Mode", it will use a lot of memory.
If you do not have enough memory, refreshing the screen may not function properly.
If that is the case, turn off "High Resolution Mode".
Getting Started
- Launching
To launch the application, touch the "Boardwidget" icon from your computer’s program launcher (app list).After launching the application immediately after installation, please agree to the software license agreement.
Screen Configuration
- Edit Board
You can edit text/handwriting sticky and photo frames by touching them. Touch the center and drag the object to move it, touch and drag the edge to expand/reduce it, or touch and drag the lower corner to adjust the angle.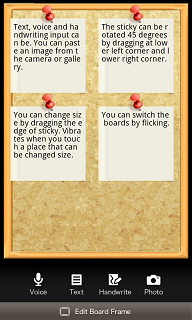
1.Voice Input
Create sticky via voice-input text. After input, it will be treated the same as a text-input sticky.Convenient for inputting brief comments.
2.Text Input
Create sticky via text input. You can set the size and color of the font.
3.Handwriting Input
Create handwritten labels. You can insert icons.
4.Photo Registration
You can register photos from the gallery or those shot with a camera.
5.Edit Board Frame
Edit a board frame.
{Menu}
Board List
Select the board to display.
Version
Display version information.
Help
Display help.
Close
Close this application.
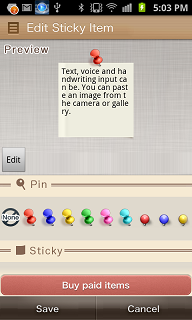
- Edit sticky Item
1.Preview
Display a preview of sticky items being created. Inputted text, selected pins, and sticky will be reflected.
2.Edit
Edit text.
3.Pin List
Select designs for pins. You can select "none" if you wish.
4.Sticky List
Select designs for labels.
5.Buy paid items
You can purchase themes if you want to add designs for pins and sticky.
6.Save
Save changes.
7.Cancel
Cancel changes.
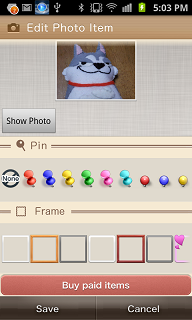
- Edit Photo Item
1.Preview
Display a preview of photo items being created. Inputted text, selected pins, and frames will be reflected.
2.Photo Display
Display photos.
3.Pin List
Select designs for pins. You can select "none" if you wish.
4.Frame List
Select designs for photo frames.
5.Buy paid items
You can purchase themes if you want to add designs for pins and frames.
6.Save
Save changes.
7.Cancel
Cancel changes.
- Handwriting Preview
1.Preview
Display a preview of a handwritten memo.
2.Delete
Delete one character before the current cursor position.
3.Space
Insert a space at the current cursor position.
4.Line Break
Add a line break at the current cursor position.
5.Icon
Insert an icon to the current cursor position.
6.Form
Set background design.
7.Edit
Edit via handwriting input.
8.Save
Save changes.
- Handwriting Input
1.Preview
Display a preview of a handwritten memo.
2.Text Input Field
You can input handwritten text.
3.Advance
Advance characters inputted in the text input field.
4.Delete
Delete one character before the current cursor position.
5.Space
Insert a space at the current cursor position.
6.Line Break
Add a line break at the current cursor position.
7.Confirm
Confirm characters inputted in the text input field, and reflect them in the preview.
8.Icon
Insert an icon to the current cursor position.
9.Pen Size
Select pen size.
10.Color Pallet
Select pen color. By long-pressing a pallet, you can select the color you like.
11.Close
Close handwriting input and the screen.
- Handwriting Output Size Settings
1.Preview
Preview output contents of handwriting items.
2.Size Bar
Change width of handwriting items. Line breaks will be automatically inserted for text too long to fit into one line
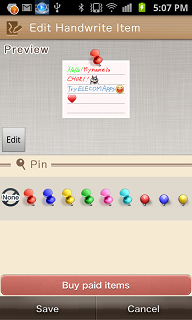
- Edit Handwriting Item
1.Preview
Display a preview of handwriting items being created. Inputted text and selected pins will be reflected.
2.Edit
Edit handwriting.
3.Pin List
Select designs for pins. You can select "none" if you wish.
4.Buy paid items
You can purchase themes if you want to add designs for pins.
5.Save
Save changes.
6.Cancel
Cancel changes.
- Edit Board Frame
1.Board Name
Input board name.
2.Frame List
Select designs for frames. You can select "none" if you wish.
3.Buy paid items
You can purchase themes if you want to add designs for frames.
4.Save
Save changes.
5.Delete
Delete board.
6.Cancel
Cancel changes.
- Widget Registration
1.Board List
Select a board to register as a Widget.2.Frame
Draw a frame on a Widget.3.Toolbar Display
Display the toolbar on a Widget. An item registration button will be placed on toolbar, enabling quick item registration by simply touching the button.4.High Resolution Mode
When you create widget in "High Resolution Mode", it will use a lot of memory. If you do not have enough memory, refreshing the screen may not function properly. If that is the case, turn off "High Resolution Mode".How to Use
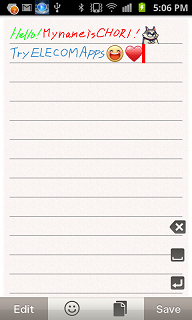
Register a Text-Input Sticky
1) Touch the "Text" button on the "Edit Board" screen.2)Input the characters to be displayed on the "Input Text memo" screen.
3)Touch the "Font Config" button and set font size and character color. Either select from the sample colors, or touch "color preview" and select the color of your choice.
4)The "Edit Sticky Item" screen will appear when you touch the "OK" button.
5)Select designs for "Pins" and "Sticky", and the results will be displayed in the preview.
6)Touch "Save" and the sticky will be registered to the "Edit Board" screen.
Register a Voice-Input Sticky
1)Touch the "Voice" button on the "Edit Board" screen.
2) The "Voice Search" screen may appear.
If it is not set to the language of use, set language from "Settings".
If it is set to the correct language, touch "OK".
3)Speak the words you want to input into your computer's mic when "Speak Now" is displayed.
4)If it is correctly recognized, possible candidates will appear, so select the word you inputted.
To perform recognition again, select "Recognize Again".
5) The selected word(s) will appear on the "Input Text Memo" screen.
From here, repeat operation 3) and on from "Register a Text-Input Sticky".
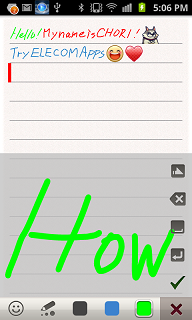
Register a Handwriting-Input Sticky
1)Touch the "Handwrite" button on the "Edit Board" screen.
2)Touch the "Edit" button on the "Handwriting Preview" screen.
3)Input handwriting to the "Text Input Field" on the "Edit Handwriting" screen.
When you write to the edge of screen, advance input characters with the "Advance" button.
4)When inputting is finished to some extent, touch the "Confirm" button to reflect your work in the preview.
5)To insert an icon, touch the "Icon" button and select an icon from the icon list.
If you want to add icons, you can purchase additional items from "New Purchase".
6)To change pen size, touch the "Pen Size" button and select the pen size.
7)To change pen color, either select from "Color Pallet" or long-press "Color Pallet" to create and select the color of your choice.
8)When handwriting-input is finished, touch the "Close" button and close the screen.
9)Touch the "Save" button on the "Preview Handwriting" screen.
10)Set output size on the "Handwriting Output Size Setting" screen.
Text too long to fit onto one line will have a line break added automatically.
Touch the "OK" button once settings are finished.
11)By selecting "Pin" on the "Edit Handwriting Item" screen and touching the "Save" button, handwriting items will be registered to the "Edit Board" screen.
Register a Photo
1)Touch the "Photo" button on the "Edit Board" screen.
2)Select "Select from Gallery" on the "Select Photo" menu.
3)Select a photo from the "Gallery".
4)By selecting designs for "Pins" and "Frames" on the "Edit Photo Item" screen and touching the "Save" button, the photo will be registered to the "Edit Board" screen.
Change Layouts of sticky and Photos
Change layouts of "Sticky Items" and "Photo Items" on the "Edit Board" screen.
1)Move by dragging each item.
2)Adjust angles by dragging the lower corner of each item.
3)Change sizes by dragging the edge of each item.
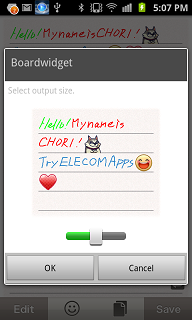
Register Board Widgets
1)Long-press on the home screen and select "Widget" from the "Add to Home Screen" menu.
2)Select "Boardwidget" from the "Select Widget" menu.
Widget size will vary depending on the Widget you choose.
3)Select which board to use from the "Board List" on "Widget Settings", and set each component.
4)Touch the "OK" button, and a Widget will be registered to your home screen.
*When you create widget in "High Resolution Mode", it will use a lot of memory.
If you do not have enough memory, refreshing the screen may not function properly.
If that is the case, turn off "High Resolution Mode".
Change Board Frame
1)Touch the "Select Board Frame" button on the "Edit Board" screen.2)You can either select an existing board from the "Board List", or select "Create".
3)Input/change "Board Name" on the "Edit Board Frame" screen, and select a board design from the "Frame List".
4)Touch the "OK" button, and the board frame will be updated on the "Edit Board" screen.