Table of Contents
- Summary/Features
- Operating Environment/Important Points
- Getting Started
- Screen Configuration
- Top Menu - Camera Photography - Correction - Preview - Editing - Project Selection
- Project List - Distribution Configuration - Simple Records - Alll Photo List - Photo Preview - Settings
- Operating Procedure
- General Photography - Continuous Shooting - Quick Shot
Summary/Features
- Summary
"WBConference"
is an application that allows easy taking, correcting, editing and
distribution of post-conference whiteboard photos.
You can perform post-conference operations, such as keystone
correction, extensive editing functions and recording of minutes in PDF
format.
- Features
1. Magnified Keystone Correction
This
automatically recognizes the section of a photographed whiteboard
containing the whiteboard, allowing magnified keystone correction.
In instances where it cannot be recognized, you can adjust the capture frame while looking through a magnifying glass.
2. Editing function that allows supplementary postscripts such as speech balloons and arrows.
Allows supplementary postscripts onto photographed pictures using speech balloons, arrows, text, pen and marker.
You can save these materials in such a way that makes it easy to understand for members absent from the meeting.
3.Distributing multiple photos and minutes together as a PDF
You can integrate several photos and meeting minutes into a single PDF and mail it.
![]()
Operating Environment/Important Points
iOS 4.0 and above
![]()
Getting Started
- Startup Process
Start up the basic application, and touch the "WBConference" icon.
After you start up the basic application after installation, please agree with the software product license document.
![]()
Screen Configuration
- Top Menu

1.Normal
Take a normal photo.
Take a picture, correct, edit and save the project
2.Continuous
Take several consecutive pictures.
3. Quick
Streamlining process between photography and email delivery, this mode allows immediately delivery.
4.Add photos from gallery
Add photos from the gallery and performs keystone correction.
5.Project List
Displays the project list.
6.Photo List
Displays the photo list.
7.Recent Photos
Displays recently-taken photos.
8.Version Information
Version information is displayed by touching the "i" button.
9.Settings
Displays the settings menu.
- Camera photography
1.Photo button
Takes a photo.2.End button
Ends photography.* In continuous shooting mode, you can take pictures repeatedly until you press the end button.
- Correction
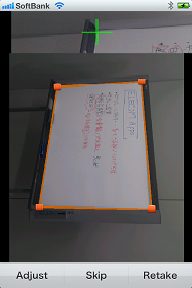
1.Magnification
Magnifies and displays a touched section of the preview screen.
Useful for specific adjustment of the capture border.
2.Preview screen
Displays a preview of shot photographs.
3.Capture border
Sets the border for keystone correction.
By dragging four points you can adjust the shape of the capture border.
4.Correction
Adjust the capture border's keystone correction into a rectangular shape.
5.Skip
Continues forward without keystone correction.
6.Retake
Discards the shot photograph, taking another picture.
- Preview
1.Preview
Displays a preview of the picture.
2.Contrast adjustment
Adjusts the contrast of the photo.
3.Rotate
Rotates the photo 90°at a time.
4.Adjust
Performs another keystone correction.
* Discards the results of keystone correction performed before it.
5.Edit
Changes to editing mode.
6.Save
Saves the photo.
7.Cancel
Discards photos and altered information, returning to the top menu.
- Edit
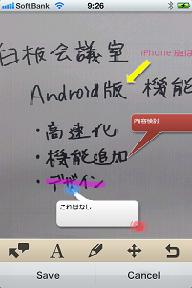
1.Preview
Displays
edit contents. Allows movement and manipulation of objects such as
speech bubbles and arrows. You can select operations from the
operations menu via a long press.
2.Balloon
Adds a balloon.
3.Arrows
Adds arrows.
4.Text
Adds text.
5.Pen
Allows drawing with a pen.You can change colors with a long button press.
6.Marker
Allows drawing with a marker.You can change colors with a long button press.
7.Eraser
Allows erasure of the photo with the eraser.
8.Move
You can move the displayed area by dragging in preview.
9.Undo
Cancel the previous operation.
10.Cancel
Discard the edited contents and end editing
11.Save
Saves the edited contents and ends editing.
![]()
- Project Selection
1.Create New
Creates a new project for saving photos.
2. Project List
Displays lists of existing projects.
3.Regist
Save photos to the selected project.When saving without selecting a
project, the photo will save without registry into any particular
project (confirm by browsing the "photo catalog").
4. Cancel
Return to the previous screen.
- Project List
1.Project List
Displays the project list. Displays recent photos, project names and memos. Allows confirmation of photos in projects by touch.
- Project Details
1.Photo List
Displays photos registered in projects in a single catalog.
Displays photo previews via touch.
2.Add from Gallery
Add photos selected from the gallery to a project.
3.Add from Camera
Activates the camera and adds shot photos into a project.
4.Menu
Displays operation menu.
[Menu]-[Operation Menu]
1.Change Title
Changes the project name.
2.Distribution Settings
Sets distribution for each project.
3.Simple Records
Records easy minutes for each project.
When easy minute contents are distributed by projects, they are inserted into the head of a PDF.
4.Memo
Records memos related to a project.
5.Delete
Delete a project.
- Distribution Settings
1.Save Format
You can select PDF or JPEG format.
Choosing PDF allows you to set "font size", "margins" and "page size".
2.Mail Address
Input email address for delivery or choose it from the address book.
3.Send
Launch email client using configured contents.
4.Save
Save altered contents.
5.Cancel
Discard changed contents.
- Simple Records
Configure and input contents to record to minutes.
1.Save
Save altered contents.
2.Cancel
Discard altered contents.
- All Photo List
Displays a list of all shot photos.
Allows a photo preview to be displayed by touching thumbnails.
- Picture Preview
1.Preview
Displays a photo preview.
Allows zoom in and out of the photo via pinch-in/pinch-out.
Also can change the displayed photo to the previous one by way of a horizontal flick.
2.Menu
Displays operation menu.
3.Left-Right Button
Can change the display back to the previous photo.
- Settings
1. Project List
By switching this to ON, it displays the project catalog at application launch.
2.Mail Settings
Sets email delivery for "Quick Shot".
3.Time Input
Configures the time entry form. Uses the "default" input forms of standard computers and the "original" input forms of basic apps.
Operating Procedure
- Normal Photography
The mode for typical photography, keystone correction, editing, project saving and email delivery.
1) Launch the application, touch "Normal" on the menu.
2) Fit the whiteboard neatly into place in preview and touch the photography button.
3) Automatically recognizes the whiteboard shape and configures the
capture frame. When the automatic recognition does not work normally,
zooming in on "points" and dragging them will align the capture frame.
4) When the capture frame is set, touch the "Adjust" button.
5) Push the "Edit" button on the "Preview Screen" and the "Editing Screen" is displayed.
6) Distribute speech balloons and arrows, perform editing tasks, and
press the "Save" button to save all contents changes.
7) At the "Project Selection" screen, choose projects to save photos
into and touch the "Regist" button. In the absence of a project, touch
"Create New" and create a new project.
8) Press the "Menu" button on the "Project Details Screen" and select "Distribution Settings".
9) On the "Distribution Settings" screen, select your designated email address and touch the "Send" button.
10) Delivery to your mail app will occur.
- Continuous Shooting
This mode is for those focused on several photos, wanting to take pictures in haste.
1) Launch the application, touch "Continuous" on the menu.
2) Fit the whiteboard neatly into place in preview and touch the "Photography" button.
3) Continue step 2), when you are finished touch the "End" button.
4) On the "Project Selection" screen select the project to save
pictures into and touch the "Regist" button. In the absence of a
project, touch "Create New" and create a new project.
5) Perform editing and delivery on individual photos as necessary.
- Quick Shot
The mode for taking and delivery photos on the spot.
1) Launch the application, touch "Quick" on the menu.
2) Fit the whiteboard neatly into place in preview and touch the "Photography" button.
3) Touch the "Save" button at the "Preview" screen.
4) On the "Distribution Settings" screen, select your designated email address and touch the "Send" button.
5) Delivery to your mail app will occur.
![]()