Table of Contents
- Summary/Features
- Operating Environment/Important Points
- Getting Started
- Screen Configuration
- Scrapbook Catalog - Title and Exchange Partner - Page Editing - Speech Balloon and Character Settings
- Sticker Catalog - Picture Editor - Graffiti - Page Browsing - Sticker Creation - Settings
- Operating Procedure
- Making scrapbooks with "Simple Page Creator
- Exchanging Scrapbooks via Email
- Exchanging Scrapbooks via Bluetooth
- Posting Crafted Pictures to Twitter
- Posting Crafted Pictures to Facebook
- Attaching Voice Memos to Scrapbooks
Summary/Features
- Summary
The application "Everybody Scrapbooking!" allows creation and browsing of scrapbooks on the Android platform, letting you build vivid memories out of your favorite pictures using the like of mounts and stickers. You can also send your crafted scrapbooks to friends easily through email or Bluetooth, allowing you to send scrapbooks back and forth to each other like an exchange diary.
"Everybody Scrapbooking!" comes with the
frames and design materials necessary for scrapbooking, letting you
effortlessly create scrapbooks with just pictures.
With the purchase of additional design material packs, you can use many
different design materials and craft even richer scrapbooks.
The "Original Sticker Creation Function (Paid)" lets you make stickers
based on your own taken pictures to use as scrapbook materials.
Scrapbook Page Editors let you scale and rotate pictures, stickers and speech balloons to freely decide your layout.
You can add postscripts to received scrapbooks, letting you add a page to each other's pictures and make it brilliant over time.
- Special Features
1.Make wonderful scrapbooks through simple actions
Through touch actions, you can blow up, shrink, rotate and position
added pictures, stickers or arrows onto your scrapbook page.
You can attach music files to playback as BGM or attach recorded
messages (requires installation of a corresponding recording
application).
Recording Applications:
Schedule St.
Voice Memo (Schedule St.)
2. It's more fun with added design materials
I want to make an even more fashionable scrapbook! For those of you
with this desire, we have prepared 3 types of paid design packs.
Downloading them separately and installing them will add these design
materials added to your sticker collection.
Make a scrapbook that won't lose to your exchange partner and give them
a shock.
Attachable item catalog
3. Simple scrapbook exchange via email or Bluetooth
Simple delivery of created scrapbooks through email or Bluetooth.
By mail, you can easily send your scrapbook to your preferred partner's email address.
4.Allows posting to Twitter and connecting to Facebook
Show off the swanky masterpieces you made to your friends!
You can attach pictures of the scrapbooks you made and tweet them onto Twitter.
You can also send saved picture files to Facebook, allowing seamless posting to the service.
5.Graffiti functions
Allows drawing graffiti with stamps or pen on your picture.
Drawing graffiti on portraits, you can write handwritten messages filled with emotion.
6.Possible management of several scrapbooks
You can manage multiple scrapbooks, letting you craft scrapbooks with many different friends.
You can set exchange partners for each scrapbook, so there's no need to reselect recipients when it's time to send them off.
7.Creating original stickers (paid content)
Allows creation of original stickers from pictures automatically trimmed to fit into frame materials.
Crafted original stickers can be used in scrapbooks as stickers.
Operating Environment/Important Points
- Startup Process
Android OS: 2.1/2.2/2.3/4.0/4.1/4.2/4.3
Screen Resolutions: 854 x 480, 800 x 480
To browse received scrapbooks, you must install this application on your Android platform.
You cannot send scrapbooks to carrier-exclusive mail apps.
Platform or carrier can affect your ability to receive scrapbooks as well.
You may not be able to send normally to certain email apps.
Using "Gmail" is recommended.
The application itself connects to the Internet.
Beware that it may show up in your packet charge, depending on configuration contents or contract details.
。
Getting Started
Start up the basic application, and touch the "Everybody Scrapbooking!" icon from the computer terminal program launcher (app list).
After you start up the basic application after installation, please agree with the software product license document.
Getting Started
- Scrapbook Catalog
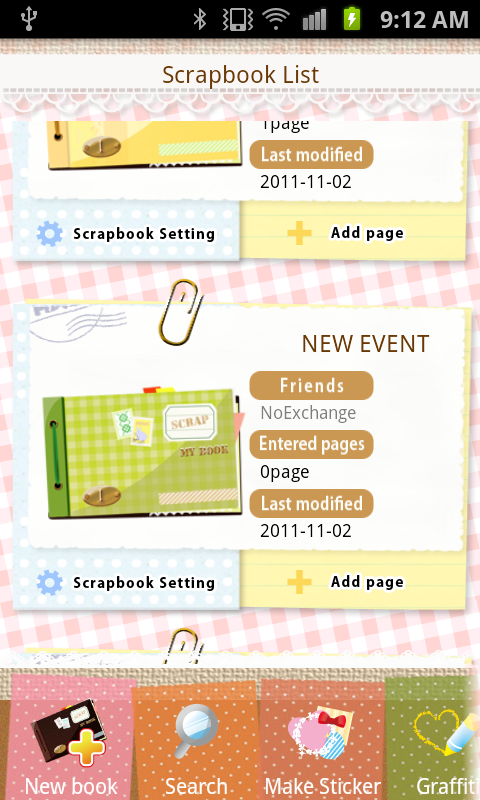
1. Scrapbook
When touched, lets you browse scrapbook contents.
2.Scrapbook Setting
Sets the title and exchange partner for a scrapbook.
3.Add Page
Adds a new page to your scrapbook.
4. Search
Searches for pages containing specific text in speech balloons.
5.Make Sticker
Performs sticker creation, duplication, editing and delivery.
6.Graffiti
Draws graffiti on a picture using pens and stamps.
7.Receive
Receives scrapbooks via Bluetooth.
8.Load data
Loads scrapbook data from an SD card.
9.Settings
Displays settings.
10.Help
Displays help.
- Scrapbook Setting
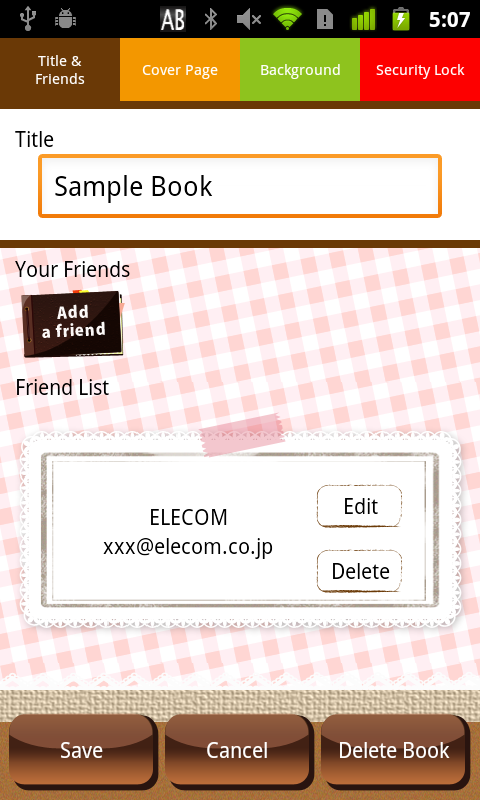
1.Title
Enters a title for your scrapbook.
2. Add a friend
Adds the name and email address of an exchange partner. You can also choose from your address book.
3.Friend List
A list of partners with whom you exchange scrapbooks.
4. Save
Saves changed contents.
5.Cancel
Discards changed contents and closes the preference editor.
6.Delete Book
Erases a scrapbook.
7.Cover Page
Selects a cover (exterior) for the scrapbook.
8. Background
Selects the background for a page.
9. Security Lock
Allows you to set password protected browsing restrictions on a scrapbook.
- Page Editing
Lets you edit individual objects such as pictures, speech balloons and sticks on the page via touch.
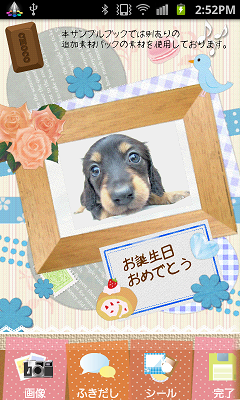
1.Picture
Adds pictures from the gallery or camera.
2.Balloon
Adds a speech balloon.
3.Sticker
Adds stickers.
4.Tape
Adds tape.
5.Sound
Adds a music file or recorded voice memos.
6. Done
Concludes editing.
7.Help
Displays help.
About Image Quality
On the page editing screen, in order to reduce the amount of memory
used, the quality of photos and materials displayed is reduced.
This allows you to handle a larger number of photos and materials
simultaneously.
- Balloon and Character Settings
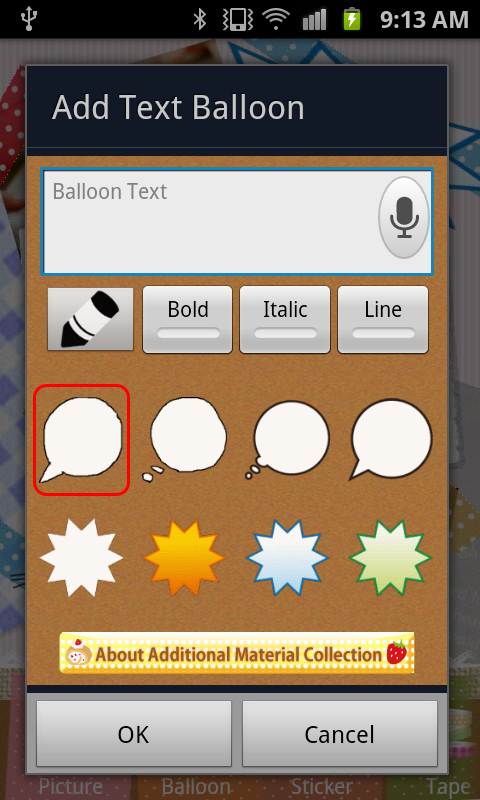
You can adjust settings for contents of speech balloons as well as the color and font of pens, and speech balloon area.
By separately purchasing additional materials, you can also increase the number of available speech balloon areas.
- Sticker List
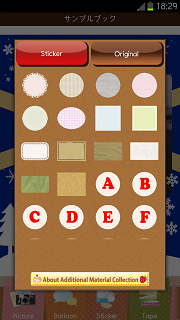
Selects sticker material to add to the page. You can increase the sticker materials to choose from through additional purchase of materials. Additional purchase of "original function expansions" as well will let you make original stickers to use as sticker material.
- Picture Editor
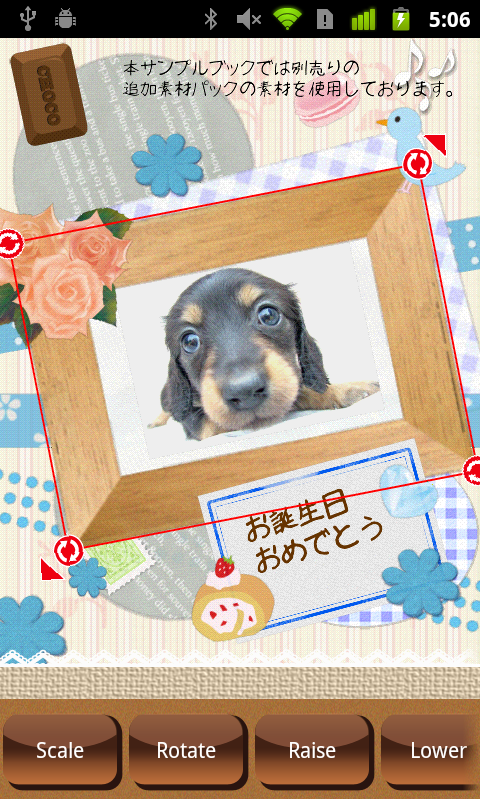
1.Graffiti
Lets you draw graffiti on pictures using stamps and pens.
2.Scale
Scales the picture (preserves aspect ratio).
3.Rotate
Rotates the picture.
4.Raise
Moves a picture one space to the front
5.Lower
Moves a picture one space to the back
6.Delete
Erases the picture.
- Graffiti

1.Pen/Stamp
Select Pen or Stamp.
2.Thickness
Sets the width and size of the pen.
3.Color/Eraser
Sets the pen color. It can also be used as an eraser.
4. Load Image
Imports pictures from the gallery or the camera.
5.Erase All
Erases all contents on the screen.
6.Undo
Undoes the last action while editing graffiti.
7.Finish
Finishes graffiti editing.
- Page Preview
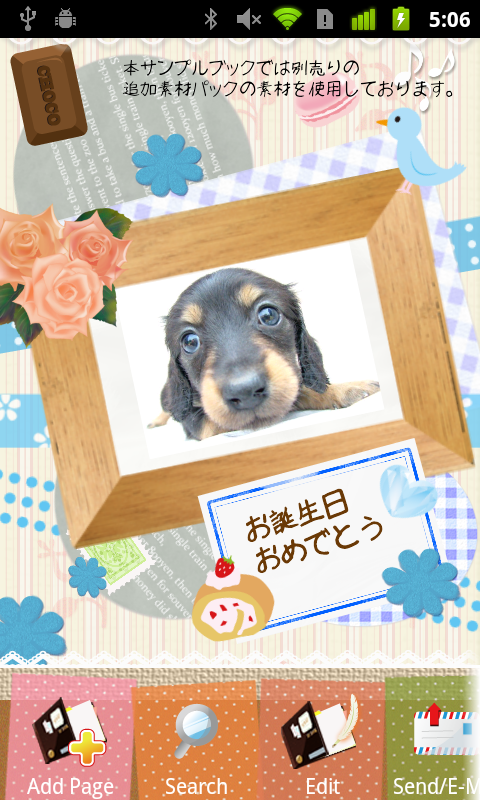
1.Add Page
Adds a new page.
2.Search
Search pages containing specific text in speech balloons.
3.Edit
Edits the page.
4.Send/E-Mail
Sends your page via mail.
5.Send/BT
Sends your page via Bluetooth.
6.Upload
Posts your scrapbook to Twitter as a picture.
7.Save Image
Saves
your scrapbook to an SD card as a picture file.
After saving, you can launch the viewer program installed on your
computer, use "Share"-like functions and send scrapbooks to other
applications.
8.Delete
Erases the page.
9.Help
Displays help.
- Sticker Creation
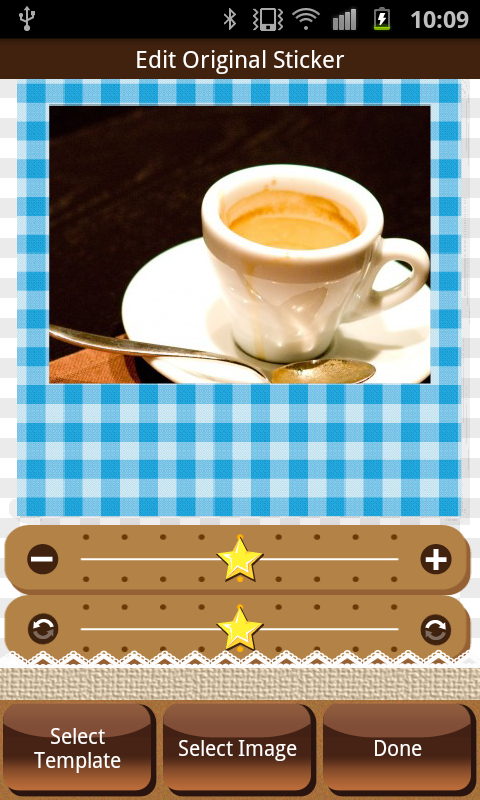
1.Select Template
Selects a sticker frame from the templates.
2.Select Image
Selects images for your sticker from the gallery.
3.Finish
Ends sticker creation.
- Settings
1.My Name
Sets your name.2.E-Mail Address
Sets your email address3.Method for create new page
Executes the new page creator.Operating Procedure
- Making scrapbooks with "Simple Page Creator"
1)Touch the "Add Book" button in the "Scrapbook List".
2)Add "Title" and "Your Friends", press the "Save" button, and create your scrapbook.
3)Touch the "Add Page" button for your created scrapbook in the "Scrapbook List".
4)Select "Easy Page Creation (Recommended)" from the "Create New Page" menu.
5)Perform "Picture Loading", "Add Balloon" or "Add Sticker" from the screen guide.
6)Added pictures and materials are posted onto your new page when you
end "Simple Page Creator". This allows you to freely edit layout,
scaling, rotation, etc.
7)When finished editing, touch the "Finish" button and save.
- Exchanging Scrapbooks via Email
You can send scrapbooks via Gmail using the following steps.
Please have a Gmail account prepared in advance. Please add your Google
account on your platform through [Settings]-[Sync Accounts].
Delivery Process
If you haven't established a mail address for your scrapbook exchange partner, please do so in the scrapbook settings.
1)Touch the "Send/E-Mail" button at the "Page Preview".
2)Select your recipient at "Send Scrapbook Page", type a message and touch "OK".
3)Choose "Gmail" from the "Complete action using" menu.
4)You are launching Gmail with configured delivery settings, so send your mail by touching the "Send" button.
Receipt Process
1)Launch Gmail, and open received mail with the subject "ExchangeScrapbook delivery".
Your friend may change this subject.
2)Open the "scrapbook.scb" file attached to the email.
You can open the file via "Execute", "Preview", etc.
3)The received contents are displayed, so touch the "OK" button and register it into your own scrapbook.
Cautionary Notes
You can use other mail services besides Gmail, but operation differs for each service, so we recommend using Gmail.
- Exchanging Scrapbooks via Bluetooth
You can send scrapbooks via Bluetooth using the following steps.
Depending on platform settings, a connection confirmation may display
in the status bar on the upper part of the screen, among other
Bluetooth configuration procedures.
If this happens, acknowledge the notice details from the status bar and
following the procedures.
Sending Procedures
1)Touch the "Send/BT" button on the "Page Preview".
This acquires the location info of the exchange area. If necessary, cancel with the "Return" key.
If it acquires your location, touching the ![]() button displayed on the top part of the page browser screen display
will let you display the location of your exchange on Google Map.
button displayed on the top part of the page browser screen display
will let you display the location of your exchange on Google Map.
2)Confirm the receiving state of your exchange partner and touch the "OK" button on the "Ready to send".
3) From the Device List, touch the device which you want to send to.If it's not in the catalog, go to "Scan".
4) If linking with a platform for the first time, a "Bluetooth Pairing Request" will display.
Touch the "Agree" button and wait for your partner to prepare.
5)Once linked with your friend, touch the "OK" button for "Confirm the destination", and sending will begin.
Receipt Procedures
1)Touch the "Receive" button on the "Scrapbook List".
2)Touch "Yes" on "Bluetooth permission request".
3)If this is the first time linking with this platform, the "Bluetooth
Pairing Request" will display. Touch the "Pair" button and wait for
your partner to prepare.
4)When linked with the sender platform, you will begin receiving.
5)Received contents are displayed, so touch the "OK" button and register it into your own scrapbook.
Cautionary Notes
- When exchanging via Bluetooth, please turn on Bluetooth on your platform.
Confirm Bluetooth settings within [Settings]-[Wireless and Networks].
Please check the manual for your platform for details.
- May not be able to send and receive normally depending on radio waves.
If this happens, please repeat the procedures again.
- Posting Crafted Pictures to Twitter
You can attach created pictures and tweet them to Twitter.
1)Select "Settings" from the "Scrapbook List", then select "Twitter Account Setting".
2)The Twitter confirmation screen will be displayed, so please input your Twitter "Username or email" and "Password".
3)Select an "Upload" at the "Page Preview".
4) Edit tweet contents at the "Upload Screen", press "Upload" and post to Twitter.
- Posting Crafted Pictures to Facebook
You can attach created pictures and post them to Facebook.
1)Select "Settings" from the "Scrapbook List", then select "Facebook Account Setting".
2)The Facebook confirmation screen will be displayed, so please input your Facebook "Account" and "Password".
3)Select an "Upload" at the "Page Preview".
4) Edit contents at the "Upload Screen", press "Upload" and post to Facebook.
- Attaching Voice Memos to Scrapbooks
You can attach voice memo messages recorded in your voice to your scrapbook and send them to your partner.
1)Select "Sound" at the "Page Edit Screen".
2)From the selection menu, select a recording app like Sound Recorded and record.
3)The "Playback Icon" is displayed on the upper-right part of the "Page Edit Screen". Touching it allows playback.
4) The "Playback Icon" is displayed on the upper-right part of the "Page Edit Screen". Touching it allows playback.
In the event there is no recording app like Sound Recorder installed on
your platform, you can install and use our voice memo-equipped apps.
- Schedule St.
- Voice Memo (Schedule St.)


